 |
By Rev. Dr. Louise-Diana |
 |
I have been teaching yoga for 30 years and it constantly changes....both my own practice and my approach to guiding others. It is always evolving and never boring. Although the poses ( asanas) themselves do not change, your relationship to them will. Anyone can start a yoga practice, even if you don't feel like you are very flexible or very strong.
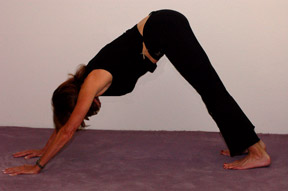
My suggestion is to choose wisely in finding the right teacher for you. Allow them to speak to your heart. Downward Facing Dog - Adho Mukha Svanasana
Downward dog is an essential pose in most yoga practices - and it's also a particularly delicious stretch. Don't be complacent in your downward facing dog - find out how you can improve it.
Instructions: 1. Come to a neutral spine. Breathe in and breathe out thru the nose. 2.Inhale,exhale, curl your toes under, and straighten your legs, 3. Bend your knees, coming up onto the balls of your feet and bring the belly to rest on the thighs and the sit bones high. Then sink your heels, straightening the legs and keeping the high upward rotation of the sit bones. 4. Hold the pose for five breaths.
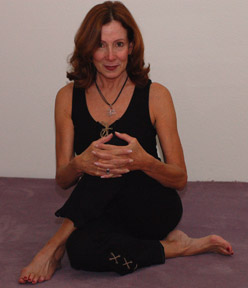
Cow Face Pose - Gomukhasana
Benefits: Stretches the hips, ankles, shoulders, and chest Instructions: 1. From Knee to Ankle, slide the knees to center, stacking the right knee directly over the left. It may be helpful to come forward onto the hands and knees to align the knees. Then separate the feet and come back to sit between the feet. 2. Bring the left arm up towards the ceiling, 3. Bend the left elbow, bringing the left hand down the center of the back. 4. Bring the right arm out to the right side, bend the elbow and bring the right arm up the center of the back. 5. Hold hands behind the back. 6. Draw both elbows toward the center. Beginners: Take padding under the sit bones if necessary. Hold a strap between the hands if they do not meet behind the back. Advanced: Keeping the spine long, come into a forward bend.
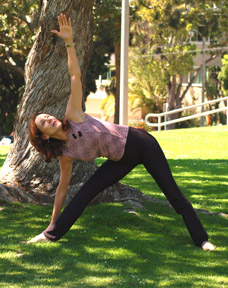
Type of pose: Standing Benefits: Strengthen the legs, stretches the groins, hamstrings, hips, opens the chest and shoulders. Can help relieve back pain.
1. From Warrior II, straighten your front leg (the left leg in this case). 2. Begin the reach the left arm forward, drawing the left thigh upwards and tucking the hip at you come forward. 3. Drop the left hand down onto your shin or ankle, or if you are more open, onto the floor inside or outside the left foot. Do whichever one feels most comfortable. 4. The right shoulder stacks on top of the left one as you open the chest reaching the right fingertips upwards while keeping the right shoulder rooted in the socket. 5. Take your gaze up toward the right fingertips. 6. Draw the left thigh muscle upwards, deepening the left hip crease. 7. Stack the right hip on top of the left. 8. Repeat on the right side Beginners: Bring the right hand higher up on your leg or use a block on the floor to rest your hand on. It is more important to keep the right leg straight than to bring the right hand to the floor. Do not rest the hand directly on the knee, though, as this creates too much pressure on the knee. Advanced: Line up the right heel with the arch of the left foot. For a variation, try dropping the left arm over the left ear so it comes parallel to the floor, while keeping the shoulder rooting into the socket.
|
 |